Composting at Home: A Guide
If you are concerned about climate change and looking for ways to do better for our planet, home composting may have crossed your mind. Today, we’ll explore the best ways to compost at home.
You’ll learn what products can be composted and, perhaps more importantly, what compostable products must be disposed of through an industrial composting program.
Ready to get dirty? Let’s dig in!
Introduction to Home Composting
Home composting has many benefits. It’s super easy to do and requires little investment. As an added benefit, you’ll reduce the amount of waste going into landfills and transform much of what you discard into a nutrient-rich substance that will help you grow incredible flowers and vegetables and make your lawn (if you have one) the envy of the neighborhood.
Your first batch of home compost might take a few months to be ready, but once it’s started, you can be confident of a consistent supply to feed your garden for years to come.
What Is Composting?
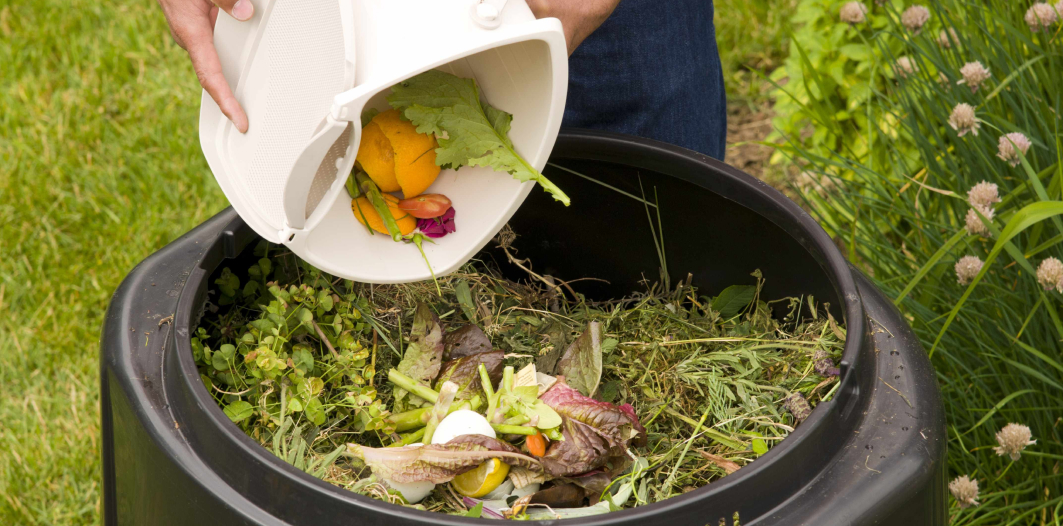
Composting is the natural mechanism of degrading organic materials like food scraps and yard waste into a nutrient-rich soil amendment by compost. This process is achieved through the consumption and decomposition of the organic matter by bacteria, fungi, insects, and sometimes worms.
To create an ideal environment for composting, the microorganisms need carbon, nitrogen, oxygen, and water in the right balance. This process can take anywhere from a few months to a year, depending on the method, materials, and how often the compost pile is aerated.
Once fully composted, the compost can be used to enrich landscaping, lawns, potted plants, and gardens. To start composting at home, your first steps are to locate a composting center near you, check the labels, sort the items, and clean and prepare as necessary.
Composting Methods for Every Home
The two main methods of home composting are hot composting and vermicomposting. It should be noted that not all compostable products can be put into your home compost. Compostable plastics, for example, require much higher heat to break down and must be disposed of through your curbside green bin program.
Hot Composting
Hot composting takes about three months to yield a viable batch of compost. You can start with a fairly large, enclosed bin or tumbler or build a wooden enclosure that’s open on the bottom. Lay straw or twigs on top of bare earth and add compost material in layers, alternating dry (sawdust, wood ashes, straw) and moist (kitchen scraps, tea bags, coffee grounds). Add green manure (chicken manure is recommended, but generally, manure from any non-carnivorous animal is okay) to encourage nitrogen activity. You’ll need to keep the pile moist but not wet, keep it covered, and turn it every few weeks with a shovel, hoe, or pitchfork.

Vermicomposting
Vermicomposting uses a particular type of worm (redworms) to break down the compost material. The worms eat your food scraps, releasing nitrogen in the process, which feeds the microorganisms involved in breaking down the material. You can purchase redworms at just about any garden supply store. Because vermicomposting is usually done in smaller containers, you can have a decent batch of compost in just six to eight weeks. Some tips for vermicomposting include:
- Don’t overfeed the worms: Start slow, and only add more food when the previous batch is mostly gone to avoid rotting, odors, and fruit flies. Also, to maintain worm health, avoid adding glossy paper, citrus, or salty foods.
- Create a hospitable environment: Keep bins in a cool, dark place with shredded newspaper, cardboard, or coconut coir for bedding. Worm bins that are too wet, dry, hot, or cold can stress or even kill the worms.
- Avoid letting worm castings build up: Harvest worm castings at least every few months and refresh their bedding to keep their environment hospitable.
Alternatively, you could choose to cold compost. On the plus side, cold composting requires the least effort—but it also takes the most time. It could take up to a year to achieve results. The method is quite simple, however: simply put your stuff in a pile and wait.
How To Start Composting at Home
- Locate a composting center near you
- Check your labels and sort the products
- Clean and prepare as necessary
Home composting sometimes gets a bit of a bad rap. Some common misconceptions include that it smells, is messy, attracts vermin, and is complicated—all of which can be true if it’s not done properly.
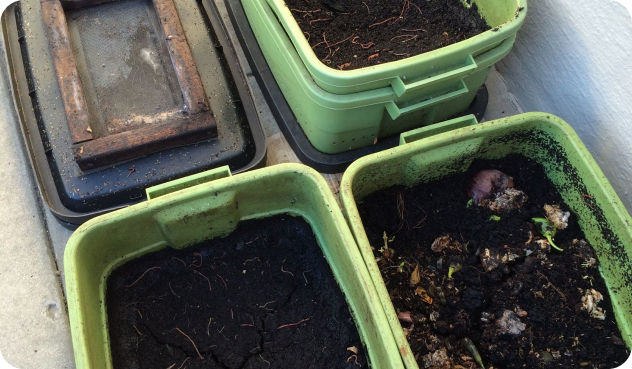
What Do You Need for Home Composting?
You’ll need a compost bin or container. Where you live and the amount of outdoor space you have will inform the type of bin you choose. Keep in mind that turning a compost pile can strain your back, so if you have issues of that nature, a tumbler or worm bin might be the best choice.
Tumblers also have the advantage of maintaining higher temperatures within the bin, which may yield finished compost much faster.
- If you live in the city and have little or no outdoor space, a worm bin is probably your best bet.
- Choose a worm bin or compost tumbler for apartment dwellers or homes with smaller outdoor spaces.
- Larger or rural properties with ample outdoor spaces can choose an enclosed compost bin, tumbler, or an open pile.
Most kitchen and yard waste can be disposed of in your home compost bin or pile. If you are doing a hot compost and combining kitchen waste with some yard waste (leaves, grass clippings, etc.), a good rule of thumb is to use two-thirds brown and one-third green materials.
Brown materials provide carbon, while green lends nitrogen. To keep your compost pile healthy, it should have more carbon than nitrogen. Too much nitrogen will make your compost too dense. If it’s too dense and heavy, air will not circulate through it, the mass will become quite odiferous, and it will take a very long time to decompose.
What Can and Can’t Be Composted: Organic Waste Types
Knowing what can and can’t be composted is key to creating a healthy, odor-free compost pile. Home compostable materials can be very different from industrial compostable materials, so we’ve prepared a list of items that can be composted in your home composter, separated into “green” and “brown” categories:
Brown (carbon-rich materials)
- Cardboard
- Newspaper
- Shredded paper
- Straw
- Hay
- Twigs, leaves, and woody pruning debris
- Sawdust
- Dryer lint
- Pine needles
- Corn cobs
- Coffee grounds
- Wood ash
- Wood chips
- Wood pellets
- Bamboo
- Dry pasta
- Nut shells
- Hair
- String, twine, natural fibers
- Cotton balls
Green (nitrogen-rich materials)
- Table scraps (no meat, fish, or bones unless you are using a composter specialized for that type of use)
- Coffee grounds and filters
- Tea leaves and tea bags (remove any staples from the bags first)
- Seaweed/kelp
- Lawn clippings
- Weeds that have not gone to seed
- Flowers and cuttings
- Chicken poop (avoid pet waste if you intend to use your compost on food plants)
Good to know
- Egg shells are also okay—they are considered neutral in terms of carbon/nitrogen.
- Don’t put banana peels or inedible fruit rinds into compost, as they may have pesticide residue.
- Do not compost waste from black walnut, as it is invasive.
- Do not dispose of diseased plants or clippings in compost.
- If composting sawdust, be sure it is clean and free of oil residues.
Common Questions and Troubleshooting
Are you curious about composting or encountering challenges? We have the answers to some of the most common concerns and tips for keeping your composting journey on track.
Is Homemade Compost Good?
Homemade compost isn’t just good—it contains micronutrients that commercial fertilizers may lack, and is packed with essential nutrients for healthy plant growth like nitrogen, phosphorus, and potassium. It’s one of the best ways to boost soil health, support sustainable gardening, and reduce your environmental impact. With the right materials and methods, it’s an effective, safe, and eco-friendly choice for any home gardener.
Is Composting at Home Worth It?
Home composting offers many benefits, such as saving you money over time and rejuvinating your garden. It also requires little time or effort to maintain. With just a few minutes a week, you can support local biodiversity, divert organic waste from landfills, and make a positive impact on your household and the planet.
What Are Some Disadvantages of Composting at Home?
As with any project, there are some drawbacks to home composting, including:
- Learning curve: Beginners may find home composting a challenge at first as they figure out the right balance of materials and settle into a regular maintenance routine of adding materials, turning the pile, and monitoring temperature and moisture levels.
- Potential for pests: If not managed properly or if inappropriate things like meat or dairy are added to the mix, compost piles or bins can attract rodents, insects, raccoons, or other pests.
- Malodorous compost: Improper composting, whether it’s too much moisture, not enough aeration, or the addition of inappropriate materials, can lead to bad-smelling compost.
- Space limitations: Unless using small form factor bins, apartment dwellers or those with small yards may find the space requirements for composting challenging.
- Time requirements: Producing a final product can take several months to a year, especially if minimal maintenance is used or the climate is cooler.
With patience and proper compost maintenance, composting at home can be a fulfilling journey despite initial challenges.
Five Common Home Composting Mistakes
Successful compost piles start with good habits. Here are five common mistakes and how you can avoid them for a smoother composting experience:
- Using an incorrect ratio of greens and browns: Too many greens can lead to excessive moisture and bad smells, while too many browns can delay the composting process. For best results, aim for a ratio of 1 part greens to 2 or 3 parts browns in your compost.
- Failing to mix or turn the compost regularly: Aerating the compost is critical to adding oxygen to the mix—otherwise, you can face slow decomposition and foul odors. Turn your pile every one to two weeks to introduce air and speed up the process.
- Underwatering or overwatering the compost: If your compost pile is too wet, it can be soggy or smelly. If it’s too dry, the materials will take a long time to decay. Aim for compost that feels like a wrung-out sponge—moist but not dripping.
- Composting inappropriate materials: Composting the wrong materials—such as meat, dairy, oils, pet waste, or diseased plants—can attract pests, introduce unwelcome pathogens, or lead to strong odors. Make sure you’re only adding compost-compatible materials to your pile or bin.
- Neglecting worm care for vermicomposting: In addition to moisture and temperature concerns, overfeeding worms, using improper bedding, and neglecting to harvest castings can all harm the worms and cause odors or pests.
What’s the Best Way for Beginners to Start?
A beginner compost bin can be a simple container or tumbler. Focus on easy-to-compost materials, such as fruit and vegetable scraps, egg shells and coffee grounds, and avoid items like meat and dairy. Maintain your ratio of greens and browns, and with some patience and a little attention, you’ll soon have rich, homemade compost for your houseplants or garden.
Ready to Start Composting? Begin Your Journey Today!
By turning your kitchen waste and food scraps into nutrient-rich compost, you can lower your waste disposal costs, significantly reduce landfill contributions, and demonstrate your commitment to environmental responsibility. One way to simplify your composting process is to commit to using compostable products rather than single-use plastic.
Greenprint is committed to constant innovation and offers a growing catalog of home compostable products, focusing on incorporating plant-based materials to eliminate the demand for oil-based single-use plastics. If you would like to take the next step toward a sustainable future, contact us today to learn more about our sustainable disposal industry ecosystem.
Happy composting!
References
- https://www.wired.com/story/home-composters-buying-guide/
- https://www.finegardening.com/article/hot-composting-vs-cold-composting
- https://rodaleinstitute.org/science/articles/vermicomposting-for-beginners/
- https://compost.css.cornell.edu/chemistry.html
- https://www.planetnatural.com/composting-101/making/what-to-use/
- /nitrogen.
Today, over 83% of consumers believe companies have a responsibility to implement sustainable practices. As the foodservice industry evolves, many businesses seek better alternatives to traditional single-use plastics. Plastic straws remain a significant topic, with over 500 million pieces discarded in the United States daily. Restaurants, food chains, and hospitality establishments can lower their environmental […]
Greenprint provides high-quality, sustainable alternatives to single-use plastic cups, lids, and cutlery, building a circular economy for a positive environmental impact. Our products make it easy for restaurants to adopt sustainable packaging, regardless of location. We offer multiple cups that have a variety of disposal methods, including home composting, industrial composting, and landfill disposal. Our […]
Disposable cups are a convenient and cost-effective way to ensure you have enough drinkware for in-store guests and to-go customers. They’re portable, easy to use, space-saving, and budget-friendly. With the number of disposable cup types available, it can be challenging to choose the right one for your needs. Here we talk about different types of […]